Showing posts with label dina wakely. Show all posts

Tuesday, 7 July 2015

Mixed media card tutorial {feat. Dina Wakely stamps}


I wanted to share with you a card I made recently using mostly Dina Wakely stamps. I havent been purposely trying to use Dina products on everything lately. I have just been drawn towards her style. Its very free and flow-y and makes me think of summer.

So for this card I went for that feel and created different layers with contrasting colours.


The materials I used:


Stamps:

Script stamp from crafty individuals

Dina Wakely stamps : Scribbly birds, grunge circles from texture set ,star script, and tweet.chirp sentiment from the scribbly birds set.

Distress inks:


Antique linen, picked raspberry, old paper, broken china, and frayed burlap

Everything else:

Blue cobolt archival ink, grey archival, and purple archival

black onyx versafine ink

clear embossing powder, (its helpful to have a small pan for embossing)

 distressing tools and pads

Heat resistant craft mat

Heat tool

double sided tape

 Navy blue base card with envelope 6" x 6"

white top card for stamping 5 1/2" x 5 1/2"

colouring pens (I used grey and yellow copics)

scissors


Method:

1. First I used my distress tools to cover my white peice of paper with antique linen distress ink.


2. Then I went over the bottom half of the card with old paper distress ink and the crafty individuals script stamp.


3.Then I took the grunge circles stamp,used the broken china ink, and stamped it three times. I only inked it once though. The 2nd and 3rd stampings are a bit lighter and called ghost prints. This really helps give it dimension.


4. Now stamp a bird in black versafine ink, emboss, colour and cut out. set that aside


5. Now put down some picked raspberry distress ink on your craft mat, spritz with water and just run a little through on the other side of the card from the star.  This will add some compositional intrest to put the bird in front of. Now dry the card completely.


6.Stamp the script star in the upper right hand corner


7. Take a small bit of sheet music and rip a tiny bit to stand your bird on. Distress the edges with  frayed burlap ( you could use any brown or tan colour. i just had this handy) mount that where you plan to place the bird.

8. Now stamp your bird straight on the card (only his legs matter here). Take your cut out bird and cut off his feet (I promise it doesn't hurt him). Paste his body over the body of the one you stamped. Now  he has legs without having to fiddly cut all around the legs. Alternatively, use a craft blade to cut out feet. 


9. After that take the "tweet.chirp" sentiment and stamp somewhere on the card


10. Now just mount the white card to your navy blue base card and your all done.


Heres another look:


A sweet little bird card fit for any occasion, really. Really fun to make as well. No off to do the school run. We have rainbows tonight. Speak soon.

                                        Always,- Kass


Monday, 29 June 2015

Life update and art journal share: How meditation works for me


Hey guys. Ive been super busy lately. June is a very busy month for our family. We have my father-in-laws birthday, my fathers birthday, Steve's birthday, my birthday, fathers day, and our wedding anniversary. This is the card I made as copper is the traditional 7th wedding  anniversary gift.


We purposely kept all of the days pretty low key. On my birthday I binge watched criminal minds episodes, Steve did the school run for me, I had a NAP, and went out for a great meal. The perfect day for me. Here are a few cards from my lovely friends at card club:


 and out for dinner:


Now we are back to normality for a few weeks. I want to get the garden tidied up before my MOM COMES BACK FOR A VISIT! That's right, my mama is coming.  I'm really exited if you haven't noticed by my dramatic use of ALL CAPS. She will be here for the last week of school for Scarlett, and her last week we have booked a week in the Isle of Wight. None of us have been there and everyone tells us its beautiful. We booked a cottage about a 1/4 of a mile from a sandy beach. You better believe I will be blogging all about it.

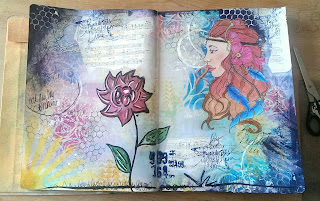
Ive also been playing in my art journal. This has been a difficult page for me. By that I mean I really liked it, then I didn't, then I was annoyed with myself for overworking it, and then I fixed it. It has been a great learning experience though. That's the amazing part of art and art journalling. All those emotions over some paint on a page.  It can take you through a range of emotions and you come out the other side learning something about yourself.

I started by putting a few stencils down, and then completely white washed the back round using gesso. Then I just continued stencilling and layering. Paying attention to what colours are over what and keeping in mind the overall composition.


I put a prima stencil down and used a distress tool with a victorian velvet distress ink to outline a
flower towards the center of the page. I then just used a mixture of gelatos, white and black posca pens and even a red sharpie to get the flower how I wanted. Now, I'm not in anyway a professional and I dont claim to be with my colouring. Meaning, im not going for realism.


Then I coloured in a stamped image of a Prima bloom girls stamp with prismacolour pencils. I cut it out with scissors and a cutting blade for the fiddly bits. I pasted it down using studio multi medium.


Then.....I ruined it. I put some awful lettering right above the flower and it looked..bad. I was mad at myself for an entire afternoon. I even mentioned it to my husband about the page screw up over dinner. Of course he said it looked great. He always does, bless him. I had a mini temper tantrum within myself saying how much I suck and I should just give up on art journalling right before I went to bed.

I woke up the next morning and it was a Saturday. I had no rush so I like to start my day with some meditation. Whilst I was meditating I completely cleared my mind. It allowed me to shed all of my insecurities and get over my hurt ego.

When I was finished I approached my journal in a new way. I fixed it. I pulled some sheet music pages apart, and pasted it using white gesso giving a whitewash coat over it.  I took a script stencil and used some yellow distress ink over it, and stamped a Dina Wakely stamp using blue archival.  I used the archival ink as it stamps a more sharp image then the distress ink.


Ta-Da! I like it again. I mean I know its not perfect but I like the composition and I fixed it. That means something. I like the journey I went down with this page.  That's what its all about.. the journey.


speak soon lovelies!!

                                                                         Always, -Kass

Monday, 15 June 2015

Art Journal page inspired by Dina wakely


Hello all, I hope this post finds you all happy and well. Ive been rather chipper myself lately and I'm chalking it down to sunshine. I feel so much happier when able to spend some long hours out in the garden getting my hands dirty. June is the time of year when things really start to bloom and take over in the garden. It's gorgeous but it is high maintenance.


 But that's not what I'm here to talk about today. I'm here to talk about a fun, flowey, art journal page I created. This week I was stoked to receive my squiggly birds stamp set by Dina Wakely, in the mail. I immediately had to get to work with them. I grabbed my favourite bird and decided to create an art journal page. This project was inspired by the artist Dina Wakely. I'm very inspired by her recently. I love her style so much. Bold contrasts, painterly brush strokes, and a "no fear" attitude when it comes to white space. To check out more of her work , click here

So here's my go at a flowy back round mixed media art journal page:


 The Materials I used on this project:

Fresco chalk acrylics- chalk, dolly mix, orange

 Daler rowley Hard bodied acrylics- magenta, turquoise, yellow

Black gesso or paint

Silver metallic acrylic paint

Large, hard bristled paint brush

Copic fineliner pen 1.0

Scissors

Washi tape- pink/white stripe, music notes

Stencils- Chevron stripes, small squares, some bottles or glasses (you can use the bottom for different size circle stamps)

Magazine clippings and/or printouts of words you can make a sentiment from

Dina Wakely Squiggly birds stamp set, and her textures stamp set

Archival ink-jet black

1. Create a flowey back round by adding water to your hard bodied acrylics and "swoosh" different colours to your liking. I like the contrast from light white to dark black and everything in between.


2.Use your stencils. First with the chalk fresco colour through the chevron stencil then stamp Dinas grunge circles with the dolly mix fresco colour. Then run your orange colour through the stencil with the tiny squares. Try and put these in compositionally  pleasing places. A rule I always go by is placing things in odd numbers. For example,  the dolly mix grunge circles I have stamped in groups of three on adjacent corners.


3.Then grab the silver metallic paint and stamp it around using the bottoms of some glass jars you have handy. (dylusions sprays work, lid from gesso pots, also glass jar lids).

4. Stamp the bird with black archival ink. Preferably in some white space so you can see it clearly.


5. Rip off 2 bits of washi tape and position them so the bird is standing on them.

6. When the page is completely dry take your fineliner pen and draw squiggles and lines randomly throughout the journal page.

7. Cut out a word or quote from your magazine clippings and paste them on how you like. I went for a quote from my favourite book The catcher in the rye by J.D. Salinger. :

"she wasn't doing a thing that I could see, except standing there,leaning on the balcony railing,holding the universe together."

8. That's it , your done. Stand back and admire your artwork.

Hope you guys liked this page. Don't forget to follow me on here and on instagram.  the link can be found here: Her altered heart instagram page,

most of the materials you see on the list can be found online at some of the following shops:

Art from the heart     a sprinkle of imagination  The craft barn  (these are UK based shops)

For some more of my projects like this one click on the following links:

Vera Lane Seaside Tag

Stampotique art journal page

All about the journey card (suzi blu inspired)

Thanks, thats it for today! Check back soon .x

                                       Always, -Kass


Thursday, 21 May 2015

ATC share using prima bloom sprays

Hello hello today's post is a very simple ATC. I made this last week but was unable to deliver it to its recipient as Scarlett was a bit unwell. Tomorrow I shall get my chance. I was asked to make an ATC that was black and white with one other colour.


I was playing around with my prima bloom sprays. Spraying little drops and swiping my paper into it.  Even though I just got a little swipe in the corner of this ATC I thought the colours were really deep, and pigmented. Okay, and technically there are two colours. plumeria, and empress gold. Its so little though I think it still fits the brief.


Then I just needed the black and white. Well the background is white so I decided to just put a simple sentiment on it embossed in black. The sentiment is from a Tim Holtz stamp set.  Then I went around the edge with the same black embossing powder and heated it.

I was almost gonna leave it there but I felt it was just too boring. I still wanted to keep enough white space showing though.   After a rummage around I decided to put some lavinia stars around the edges and a Dina Wakely circle stamp in adjacent corners. Then I used my crop o dile tool to put a white eyelet with a black and white Amy Tangerine plus one ribbon.

That's it. Pretty simple. Simple is okay though. White space is okay too. I really like that about Dina's style. She is not afraid to leave a space open. The white space can help draw the eye to the main subject of your work.


Just a short post today as I'm super busy sorting out my back garden. Ill be back shortly with a simple guide to hopefully take some of the stress and anxiety of tackling your garden clean up.


                                                                      See ya again soon!  Always, -Kass